A good URL with slides about NTLM relay can be found here. I recommend giving it a quick read and maybe watching a video to understand what is happening.
Prerequisites:
- Domain controller with Active Directory setup.
- See this series, to set up your lab environment.
- Kali Linux
- Two (2) Windows 10 VMs, joined to a domain
Setting your environment
As with many of the tutorials I’ve written so far, we’re going to use a folder called scans which is shared to a user on the network. There is some additional set up involved this time, including disabling SMB signing within our Domain Controller.
ON YOUR WINDOWS SERVER VM

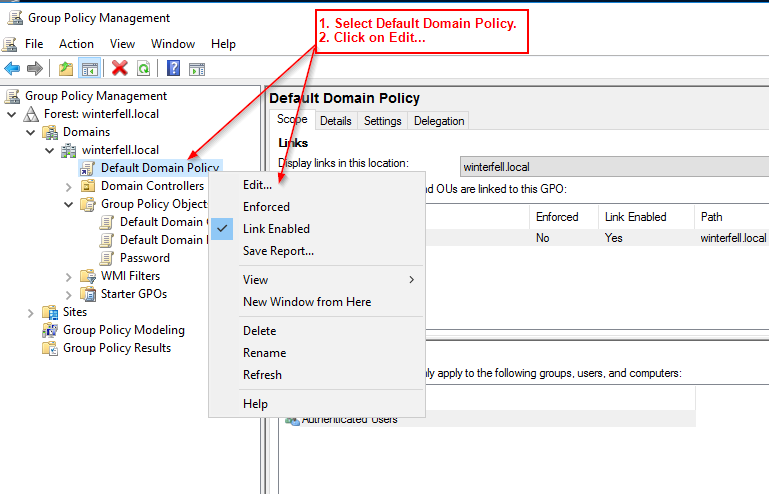


So as we can see above we’ve disabled SMB signing. Now we can back out of our Windows Server VM and hop on the Windows 10 machine.
ON WINDOWS 10 VM #1 (GREYJOY)
This might get confusing to read. A bit easier in a video demonstration, but I’ll try to explain whats going on. We are going to add a domain user as a local administrator to the Windows 10 machine that we are going to get the local SAM hashes from. This machine will be where we add the Scans folder. So here’s a quick breakdown of the naming convention on my current AD lab environment.
Windows 10 VM names:
- BASTARD
- LANNISTER
- GREYJOY
Domain Users:
- jsnow
- tgreyjoy
- tlannister
- And of course our domain admin
I will be adding the domain user jsnow, as a local admin on the machine GREYJOY for this scenario. I will create the scans folder on GREYJOY and give jsnow read/write permissions. And then I will go on the BASTARD (Win10 VM #2) and type in the IP of the attacking machine, which will emulate a user trying to access the “Scans” folder from another machine, but failing. This will then be intercepted and exploited. Confused? I hope not.


So now we’ve added jsnow as a local admin to GREYJOY, we’ve created a folder in the C:\ drive titled “scans” and have gave jsnow read/write permissions. Now we will move over to our Kali VM.
ON YOUR KALI MACHINE
Here comes the fun part. Now we are going to use responder in part with a tool called ntlmrelayx.py. For this, we’ll need to install impacket. This can be achieved by following the steps below:
In a terminal, cd /optType in "git clone https://github.com/SecureAuthCorp/impacket.gitsudo updatedbcd impacketpip install .
Impacket can be found on Github here: https://github.com/SecureAuthCorp/impacket.
Now we will boot up responder. But first, we need to edit the Responder.conf file to turn off SMB and HTTP servers.

Save and close the file and start responder by following the image below.

Now we will find ntlmrelayx.py, set a target in the target.txt file which ntlmrelayx will look at, and then start it up to begin listening for events and hopefully dump local SAM hashes.

ON YOUR WINDOWS 10 VM #2 (BASTARD)
Okay, so now hop onto your other Windows machine. We’re going to simulate a user attempting to access a shared folder, but instead sending the request to the attacking machine.

I logged in as “jsnow”, the user who has read/write permissions on the scan folder. I typed in the IP address of the attacking machine and hit enter.

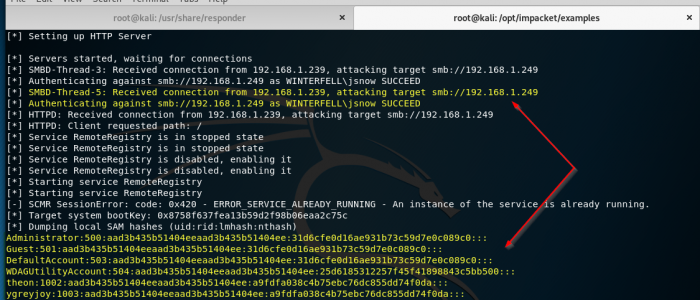
On Kali in our responder terminal we can see some event traffic.

And sure enough, ntlmrelayx.py has captured this traffic, authenticated the user (jsnow. Reminder: a local admin). And then it dumped the local SAM hashes.
And there it is! We successfully performed an NTLM Relay attack and have dumped the hashes of the GREYJOY machine. We can attempt to do an offline password crack on these hashes, and get some clear-text creds. And we can also attempt pass the hash. Additionally, with ntlmrelayx.py, we can execute commands, such as an empire payload to get a shell.

