
Part I: Part I: Requirements / Installing Operating Systems
Part II: Part II: Setting up Active Directory
Part III: Part III: Joining Windows 10 to Domain, Mapping Shared Folder, & Quick Kali Configuration
Part IV: Part IV: Attacking
Introduction:
This is part one of a series of posts I’ll be making on performing an LLMNR poisoning attack. I have been closely following a series titled “Zero to Hero Network Pentesting” by The Cyber Mentor, while simultaneously working on my OSCP. The series can be found on his website, as well as his YouTube page.
Forewarning:
This page is FULL of images and is lengthy. Don’t let that get in the way of following through or reading, it’s mostly just clicking Next or Continue, I just wanted to document it as best as possible.
What is LLMNR Poisoning?
I’m stealing a bit of information here, but it’s explained beautifully by Heath Adams, a.k.a. The Cyber Mentor. He’s a Sr. Penetration Tester, so I’m not going to attempt to explain it better. For his blog post and my inspiration, click here!
LLMNR (Link-Local Multicast Name Resolution) and NBT-NS (NetBIOS Name Service) are used to identify hosts when DNS fails to do so. A key flaw of LLMNR and NBT-NS is that both services utilize a user’s username and NTLMv2 hash (Windows password hash) when appropriately responded to, allowing for a potential man-in-the-middle attack. Let’s take a high-level look at what such an attack looks like:
Heath Adams, Senior Penetration Tester
NorthState Technology Solutions, 2019.

Heath Adams, Senior Penetration Tester
In the above example, we have a server, a victim, and a hackersitting in the middle. The victim is trying to get to the network share of \\hackme, but has accidentally typed the share name as “\\hackm”. Since this share does not exist, the server does not know how to resolve the address.
With LLMNR and NBT-NS enabled, the victim machine asks all hosts on the network, via a broadcast message, if they know where “\\hackm” is. Our attacker, being the malicious fellow he is, lies about knowing the location of the non-existent share. Why? Because the victim machine sends over its Windows login credentials in an attempt to connect to that share.
NorthState Technology Solutions, 2019.
Requirements:
Virtualization Software:
A popular virtualization software is VMware Workstation. A trial of VMware Workstation can be downloaded at the following link:
https://www.vmware.com/products/workstation-pro/workstation-pro-evaluation.htmlOperating System ISO’s:
For this series, I will be using Windows Server 2016 and Windows 10 Pro. However, Windows 10 Enterprise can be used as well and is linked below for download. These can be legally downloaded for trial use on Microsoft’s website. Additionally, a copy of Kali linux will be used to perform our attack.
Windows Server 2016:
https://www.microsoft.com/en-us/evalcenter/evaluate-windows-server-2016

Windows 10 Pro:
https://www.microsoft.com/en-us/evalcenter/evaluate-windows-10-enterprise

Kali Linux:
https://www.kali.org/downloads/
Note:
Normally I would try and detail as much as I can for setting up this lab environment, including VMware Workstation settings and installation. However, due to the nature of this series, there is a bit of an assumption that the reader has a baseline knowledge in virtual machines, networking, and possibly installing Operating Systems. For those that don’t, no worries! Go ahead and start watching “Zero to Hero” series from week one, and you’ll be in good hands! Click here to start watching.
(Also another reason is because I’m doing everything on Proxmox using my Dell R710 server).
Installing Windows Server 2016

Upon booting up your VM, you’ll be presented with the Activate Windows screen, we can skip this by clicking “I don’t have a product key” and clicking next.

Here we’ll choose Windows Server 2016 Standard (Desktop Experience). This is helpful for a nice GUI interface.


After clicking through, we’ll be asked where we want to install Windows. We want windows to create the partitions for us automatically. So click New > Apply.


You’ll be presented with the installation screen. Depending on your PC and whatever specs you allocated to the VM, this could take a while. After being patient and letting the installer do it’s thing, we’re then prompted for a password. Set a password that is adequate for you. We’re doing a simple pentesting lab and this isn’t a production server, so a super complex password isn’t entirely necessary, but it is good practice.


And just like that, Windows Server 2016 has been installed and we will now be logged in. We’re not configuring our Domain Controller just yet, we still need to install Windows 10 Enterprise (or Pro), and then Kali linux.
Installing Windows 10:
This installation will look very similar to the Server 2016 installation, with a couple different screens. This is mostly a click through process with little interaction.


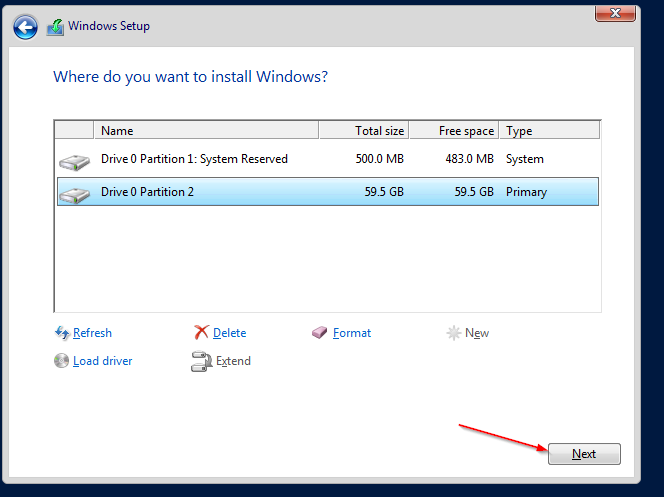
Again, we’re asked where we want to install Windows. We’re going to do the same thing as before. Click New > Apply > Next.


Note:
When creating a domain, it’s often seen to use similar nomenclature when deciding what a server / PC will be called. In this case, I stuck with a Game of Thrones theme. As of writing this we’re in Season 8 with two episodes left!
Anyway, I went with Jon (Snow) as the user of this PC.


We’ll be asked to create a “super memorable password”. Go with whatever you want, I went with Password1. After all, this is Jon Snow, he knows nothing about making a good password.
Installing Kali Linux:
This may be intimidating for anyone who have not experienced installing a Linux operating system — but I swear its easy! We will be running through the GUI installer (make sure you select this), and then running through the most basic selections. We will still get exactly what we need by touching as little settings as possible.


FYI, we don’t need to make the hostname or Domain Name any special.


Create a password you see fitting. Now we are at the Partition Disks portion. Remember when we installed Windows 10 / Server 2016? This is exactly what Windows was asking us about when it asked where we wanted our installation. Again, we’re keeping it simple and easy! Click “Guided – use entire disk” and Continue. We will keep clicking through until it prompts us to “Write the changes to disks?”


Make sure to click “Yes” here.


Finally! We’re done. By now, you should have installed Windows Server 2016, indows 10 Enterprise or Pro, and Kali Linux. Now we move onto our next post in the series. In this next post we will make important configurations to each of our machines to ensure we get that sweet moment of gaining credentials!


Excellent article that is illuminating for the seasoned professional, yet accessible to a layperson. Great work!